Amazing Fireworks – Tips & Tricks for Fantastic Photos

‘Tis the season for festivals, summer events, outdoor concerts & breathtaking fireworks displays that go hand-in-hand with summer nights. While those are all awesomely fun, my favorite part is capturing amazing photos of the fireworks.

When researching how to take the best photos of fireworks you’ll find information about taking them with a point-and-shoot style camera or your phone (where most people suggest using the “Fireworks” mode that is likely one of the built-in settings), but if you’re looking to step up your game a bit and happen to have a D-SLR, that’s when the fun truly begins!

Fireworks Tips & Tricks | theinspiredparent.com

First of all, if you have a D-SLR, for all that is good in the world, do not shoot on Auto. If you haven’t already done so, take a basic photography class so you can learn how your camera works & what the settings mean. A lot of people think “hey, I have a nice camera so now I can take nice pictures.” Even the nicest cameras can produce crappy pictures if you rely on the Auto setting and act as if it’s just a fancy point-and-shoot camera. Learning your equipment and some photography basics will greatly improve your images and that is the ultimate starting point. If you’re going to spend thousands of dollars on a nice camera body and solid lenses, then be sure to invest in a few classes! You’ll be so happy that you did!

Off my soapbox and on to shooting fireworks!

Loved having the outlines of the people in the shot - adds an extra bit of visual interest!
Loved having the outlines of the people in the shot – adds an extra bit of visual interest!

Fireworks - Photography Tips & Tricks | theinspiredparent.com

Many of the guides you’ll find online suggest using a tripod, shooting with a low ISO of 200 or so, with an aperture ranging between f/8 to f/11 and using a longer exposure time of a second or two. Shots using that method will give you some lovely blurring effects. That said, there are times when I don’t want to haul my tripod along (or certain venues where they aren’t allowed) and other times where I want to stop the action without as much blur, depending on the style of shot I wish to produce.

Without using a tripod you can still get stunning shots of fireworks by holding your D-SLR in hand, as long as you tweak a few things in camera and then tweak a few more simple things during post-processing.

The Basics:
Several details come into play as far as the settings to use — how much ambient light is nearby, how close you are to the action, what camera body you’re using and which lens. You’ll need to do some instant fine-tuning during any fireworks show, so it is vital that you know your equipment and understand your settings. For years, I’ve shot in Manual for everything, as well as in RAW format. That gives me the most control over what I’m shooting and the way I handle noise reduction and other levels during post-processing. Since I shoot RAW, I generally keep my white balance on auto since I can always tweak things in post.

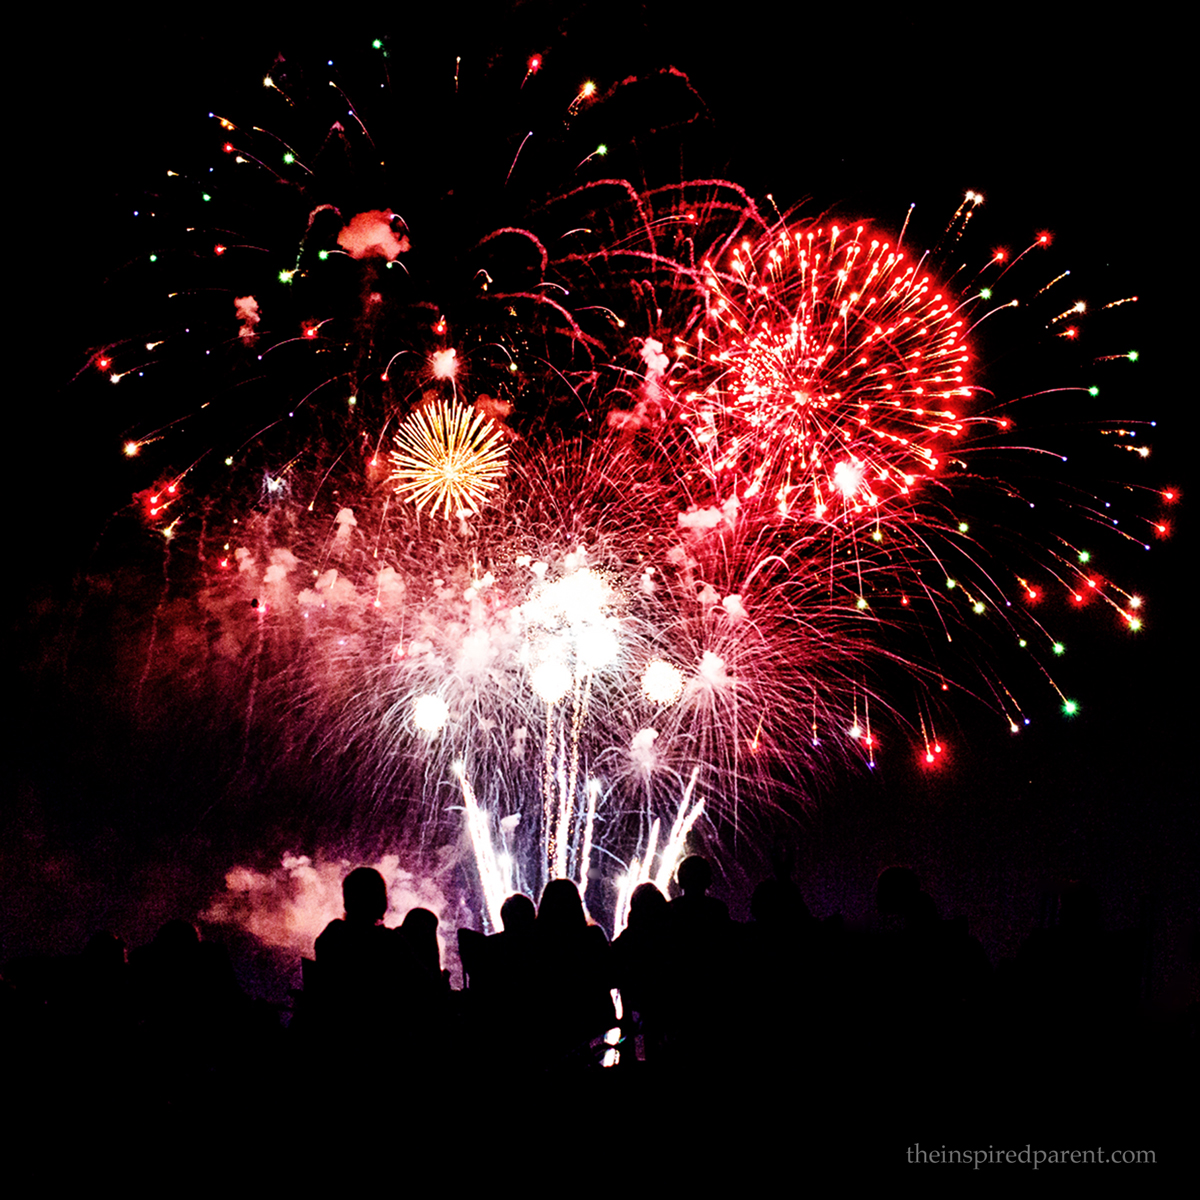
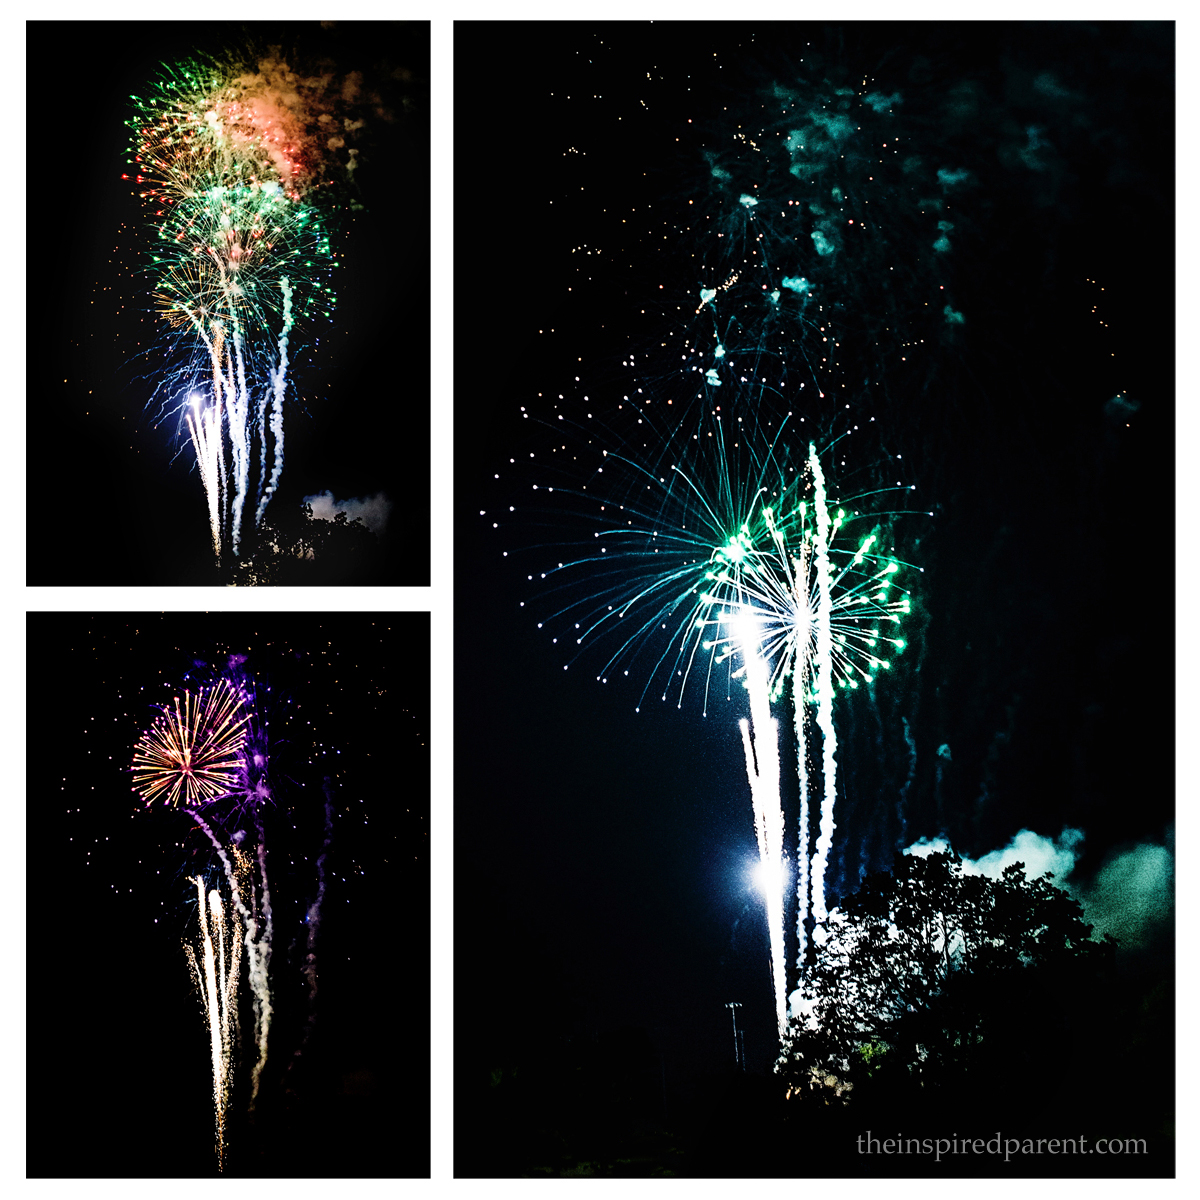
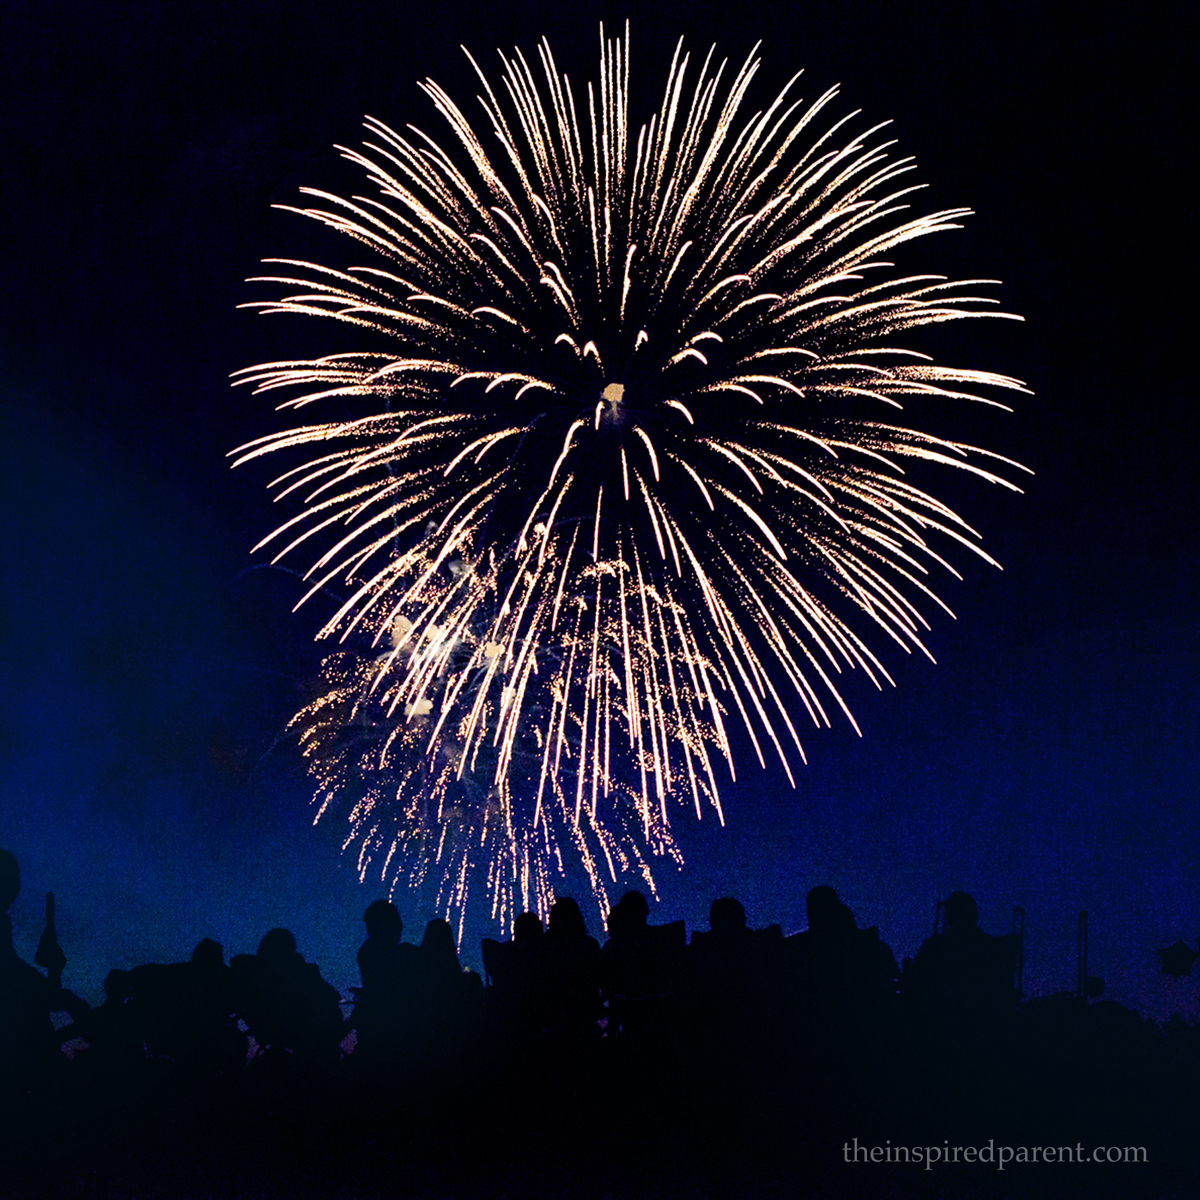
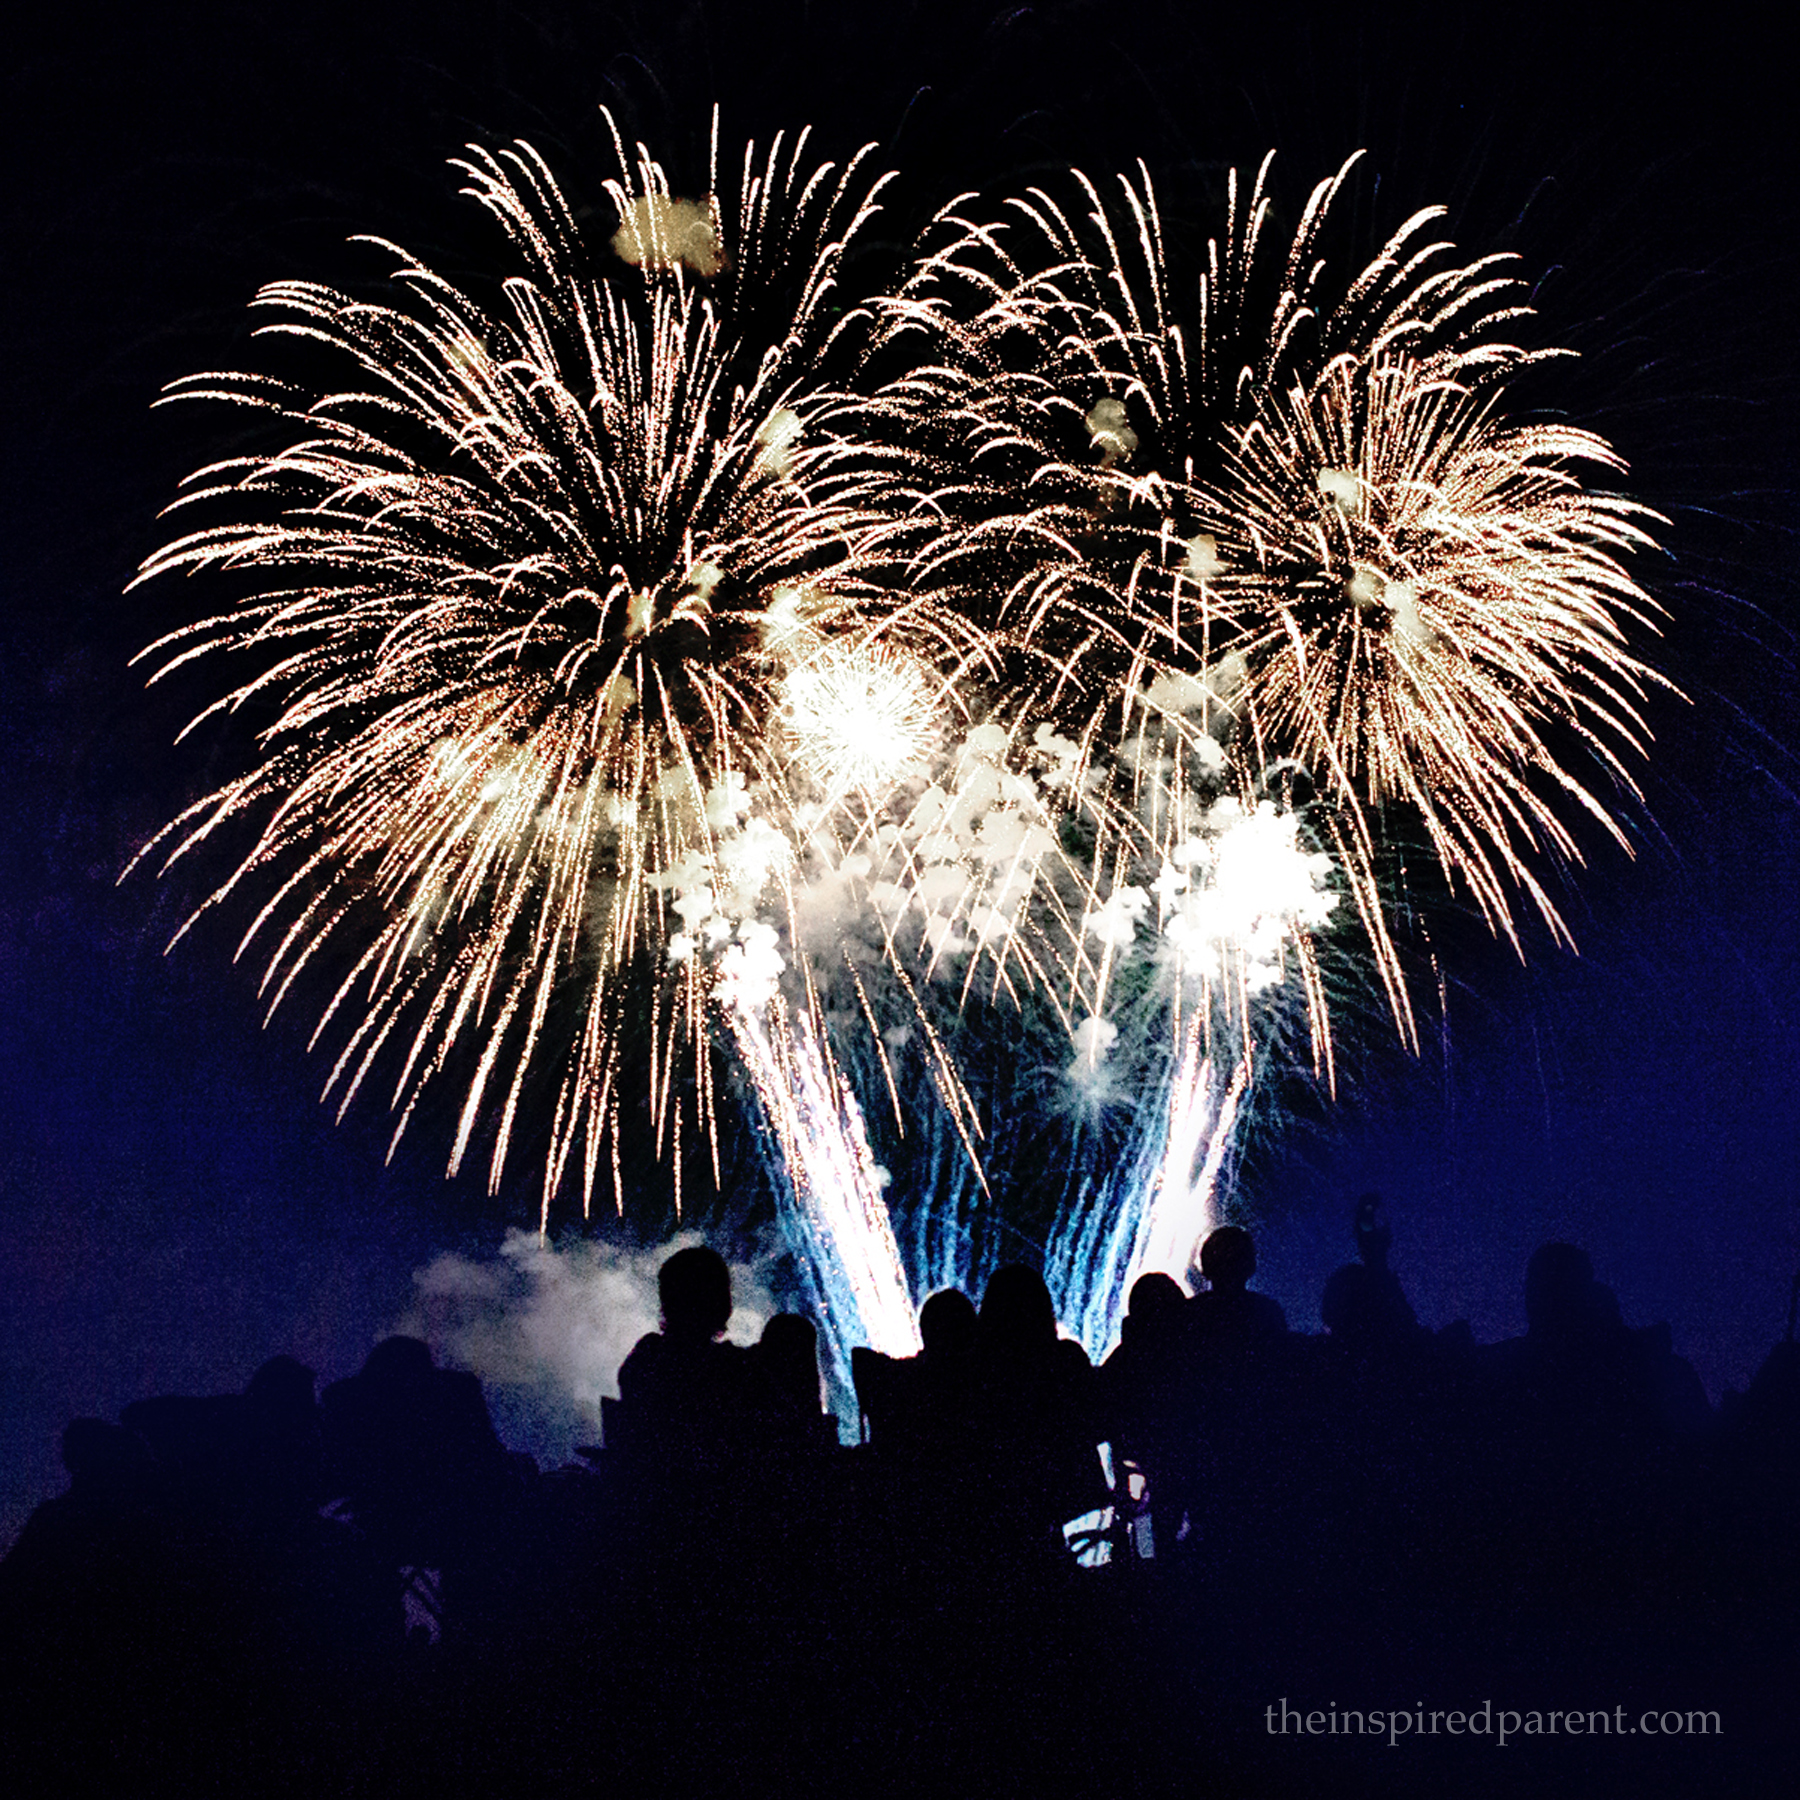
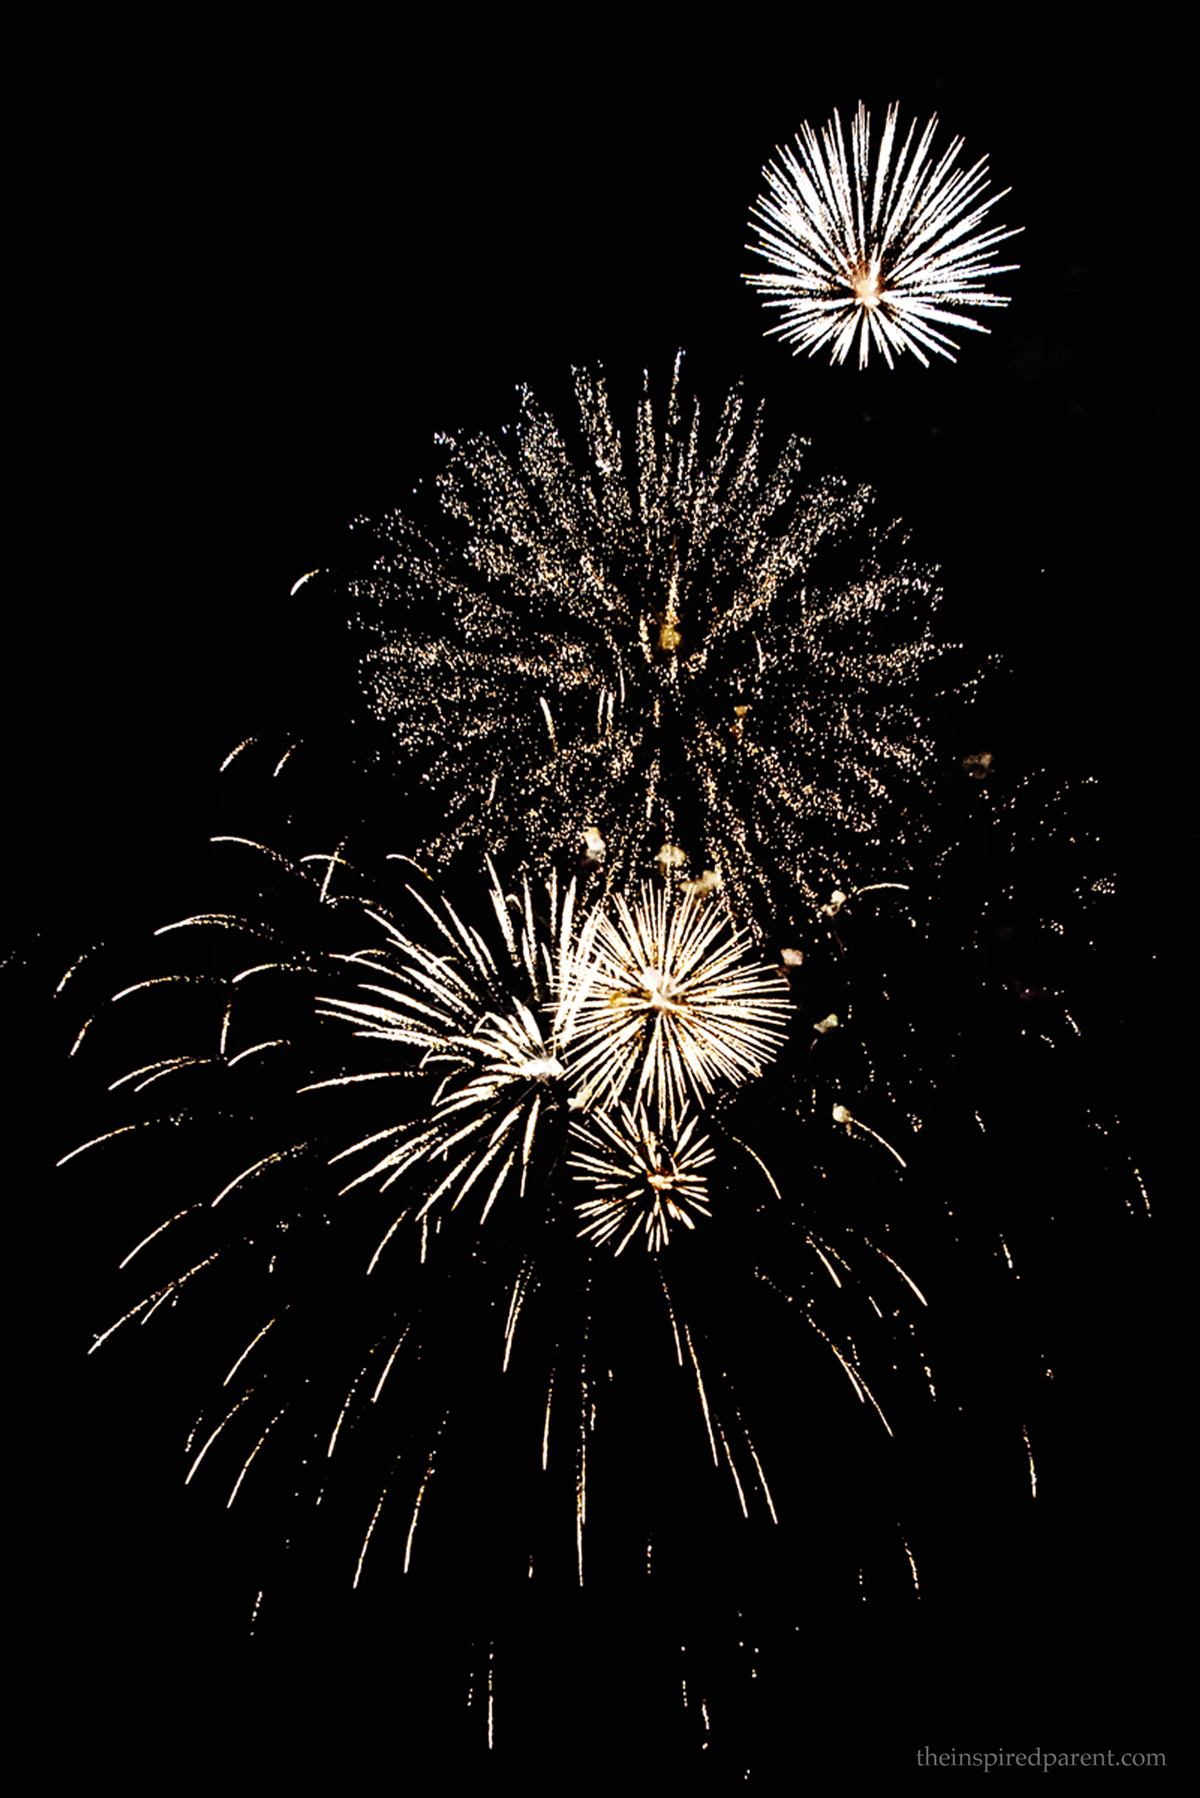
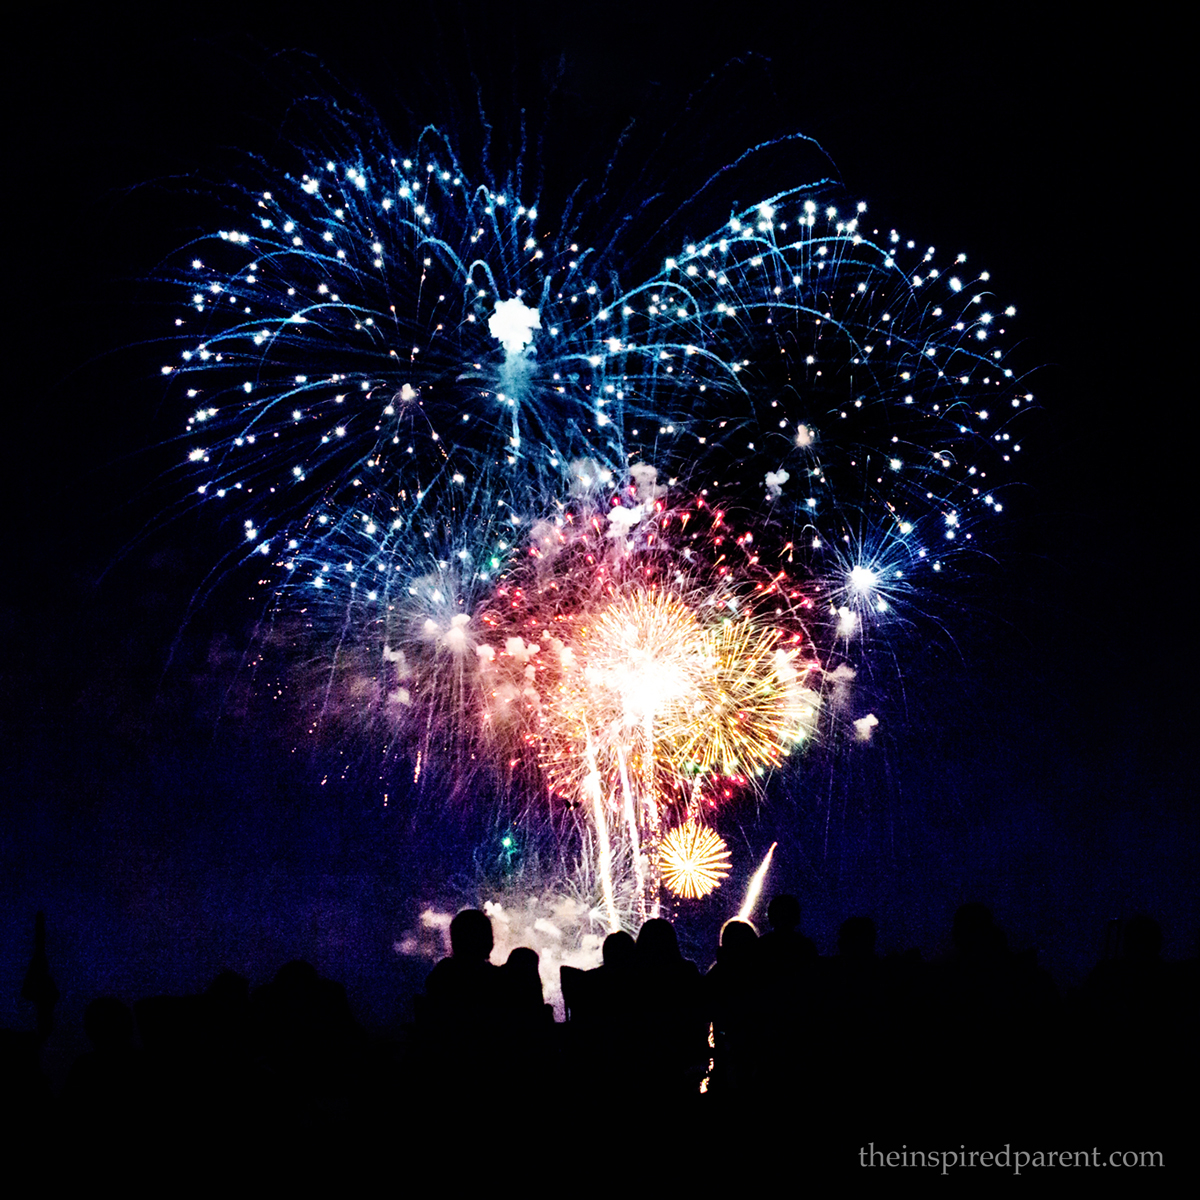
Using examples from the last two years of some images I captured on the 4th of July (two different locations), all were shot without a tripod by handholding a Nikon D600 using either a Nikkor 50mm f/1.4G lens or a Nikkor 17-35mm f/2.8D lens.

My ISO for all of the shots ranged from 2000 to 6400 with most at 6400. For the super bright shots at the end of the shows where a gazillion fireworks were being blown off at once, I would lower my ISO or adjust my aperture or shutter speed. I typically kept my aperture between f/4.5 to f/5.6 with my shutter speed around 1/100 of a second. This stopped some of the action but left slight blurring at times, and gave me the effect I was looking for based on my style of shooting.

Amazing Fireworks - Photography Tips | theinspiredparent.com

General Composition & Focus:
I used a combination of auto-focus and manual focus, depending on the situation. Some of my favorite shots ended up having the outlines of the audience in the frame — I liked the extra bit of visual interest. For those particular images, the people were seated on a slight hill, maybe 6-8 feet higher than where I was sitting. For most of those shots, I was shooting horizontally to capture the people on the hill. For some of the others, I shot vertically to capture the fireworks that were exploding a bit higher in the sky.

Amazing Fireworks - Photography Tips | theinspiredparent.com

Amazing Fireworks - Photography Tips | theinspiredparent.com

Post-Processing:
After downloading these particular photos, I handled my RAW processing in Lightroom to take care of my noise reduction, tweaking the sliders for blacks & shadows (making them a hair darker) and on a few of the bright ones, very lightly tweaking the sliders for whites & highlights. After that, I exported the shots to Photoshop to do any minor levels work & to perfect the sharpening on those I planned to print. Ultimately, these were very minimally processed — no major bells and whistles as I did my best to get everything as close to perfect in-camera.

Final Reminders & Tips:
1. This may seem obvious, but make sure your batteries are charged and you have lots of room on your memory card(s). The luxury of digital photography is that you can shoot a gazillion images and easily delete the not-so-great ones (which would be quite expensive if you were shooting tons of shots & paying for the film to be developed, only to have a few keepers).

2. Know your equipment. Whether point-and-shoot or D-SLR, learn your equipment so you know how to quickly change your settings on-the-fly. You don’t want to miss the action by staring at your camera trying to figure out how to tweak things. This takes time — be patient with yourself, take a photography class (or three) and keep at it. Eventually you’ll be changing those camera settings on what feels like auto-pilot.

3. If shooting fireworks without a tripod, try to keep your shutter speed around 1/100 to avoid camera shake (yes, there are caveats to this rule, but this speed seems to be safe speed for most people).

4. Most importantly: practice, practice, practice! When you’re done with that — practice some more! Play with your settings and have fun!

One of my favorite photos I've taken of fireworks - shot at the Taste of Oak Brook in Oak Brook, IL.
One of my favorite photos I’ve taken of fireworks – shot at the Taste of Oak Brook in Oak Brook, IL.

Article updated July 2017

Magnificent Medieval Times!

We were recently talking about taking our 7-year-old to Medieval Times Dinner & Tournament and so I booked tickets for this past weekend as a Father’s Day surprise for my husband. He and I had been there with adult family members about 15 years ago. The show’s format was basically as I remembered, though this time, the yelling and screaming and cheering for our knight and chanting our knight’s colors “Red & Yellow! Red & Yellow!” all while sitting with our excited, bouncy kid, made the experience even more fun.

Magnificent Medieval Times | theinspiredparent.com

Our closest Medieval Times is in Schaumburg, IL — a suburb outside of Chicago. There are currently nine locations in total (eight in the U.S. and one in Canada). I often see coupons/discounts online for the show and by doing a quick web search, I found a “summer discount” of 40% off each ticket and applied the coupon code at checkout. Discounts vary by location and days of the week, but if you are flexible with dates, you can definitely find some great deals for the show.

There are three upgrades to the basic tickets — the King’s Royalty Package, the Celebration Package  & the Royalty Package — they include various levels of priority VIP seating and other fun extras such as group photos & announcements by the King during the festivities. We went with the least expensive upgrade — The Royalty Package. This gave us Priority Castle Access, VIP seating, Priority Seating Access, Knight’s Rally Towels, Cheering Banners and VIP Lanyards. The package was an additional $12 per person and was worth it as we truly did have awesome seats & it was quite fun using the rally towels & cheering banners during the show.

Medieval Times | theinspiredparent.com

Doors opened 75 minutes prior to our 4:30 p.m. show. They recommend getting there as early as possible after the doors open to obtain the best seats — they are assigned once you arrive at the castle in whichever category you purchased. It’s quite the brilliant strategy on their part from the sales standpoint, as it gets show-goers in the castle nice and early in hopes of obtaining the best seats & that means there is more time to browse & buy souvenirs & drinks while meandering through the castle before the show begins. There are several kiosks with everything from light-up swords to fancy crowns to toys and decorative figurines and more. They also have a few bar areas set up where you can purchase beverages of both the alcoholic and non-alcoholic varieties to take with you while you explore. You can even pre-order bottles of wine for during the dinner show.

Although you are slightly bombarded with things to potentially purchase, it was a lot of fun arriving early. They do some pre-show festivities during that hour in the Great Hall. For those who pay a bit extra, you can participate in a knighting ceremony — we didn’t purchase that experience, but it was fun to watch. The actors did a great job with the pre-show theatrics and getting everyone pumped up & excited to be there.

After we watched several guests participate in the knighting ceremony, we decided to explore the castle. They have some neat artwork in different areas as well as various historic artifacts on display. We strolled through one section and ended up running into the Royal Falconer along with a beautiful, 9-year-old falcon named Liberty who was going to perform in our show. It was very cool for the kids (and their adults!) to see the falcon up close and have the chance to ask lots of questions & learn about how falcons were used back in that time period. Arriving early was worth it for that experience alone.

Medieval Times Royal Falconer | theinspiredparent.com
The Royal Falconer & 9-year-old Liberty. It was wonderful having the chance to see the falcon up close before the show and to learn more about these gorgeous creatures!

You can also see the horses ahead of time if you head to another area when you first arrive, but we didn’t get over to that section of the castle in time, so the horses were already “backstage” prepping for the performance. We’ll definitely head over there early on our next visit.

If you have time and are interested, there is a Torture Museum at the castle as well — I hear it’s pretty cool so we’ll have to check that out down the road. We skipped it this time around since we figured it might be a bit too intense for our little one.

Just as we finished up talking with the Royal Falconer, they announced that the doors to the arena were opening. Since we had purchased one of the VIP upgrades, we were allowed to enter the arena right away. The servers were fantastic and ours, in particular, was great fun! He joked with the kids in our row every time he came by and got a great reaction when he told our daughter and the little boy she was sitting next to that the chicken he was serving was actually a baby dragon like Spike from My Little Pony. That got huge “eewwwwws” from all the kids as well as lots of giggles!

Our awesome server (center) took part in the opening ceremony & he made sure to wave to our section to get all of us cheering for the Red & Yellow Knight. He made our dining experience such a treat!

The food was great — I remembered it being tasty last time as well. The kids all got a kick out of the fact that there are no utensils so you have to eat everything with your hands & drink your soup out of the bowl without a spoon. The meal consisted of garlic bread, a super yummy tomato bisque soup, roasted chicken that was perfectly moist with a still-crispy skin, corn-on-the-cob, herbed roasted potatoes, two rounds of select beverages (our choices were cola, lemon-lime soda, iced tea & lemonade). For dessert, we had an apple turnover & they served coffee as well. During dinner you can also order other beverages from the bar, for an additional charge.

I won’t spoil the theme & background story of the show, but as for the logistics, each section of the arena is assigned a specific knight who is yours to cheer on to victory. We were seated in the section for the Red & Yellow Knight. We were also technically able to cheer on the Green Knight and the Blue Knight since they were on our side of the arena as well, but had to watch out for the Yellow Knight, Black & White Knight and the Red Knight…they were our foes.

Go Red & Yellow Knight!!!!!

Red & Yellow Knight - Medieval Times | theinspiredparent.com

The two-hour show includes demonstrations of Falconry, Horsemanship, Weaponry & Jousting. Some segments of the show are in tournament format — knight against knight — and some other parts add to the drama of the overall story. In addition to enjoying the various games & battles (the sparks coming from the swords during the battle scenes were a huge hit!), we all really enjoyed watching the horses.

The price of the tickets was more than worth it just to see the reaction of sheer amazement from our daughter when the first horse came running out through the fog…her jaw dropping to the floor paired with her long, drawn out vocalization of “WHOA….they are BEAUTIFUL…!!!!!!” was priceless to us. The horses truly were stunning & their gentle gracefulness was lovely to see.

Medieval Times | theinspiredparent.com

Medieval Times | theinspiredparent.com

Medieval Times | theinspiredparent.com

Medieval Times | theinspiredparent.com

Medieval Times | theinspiredparent.com

Medieval Times | theinspiredparent.com
Gorgeous horses, beautiful costumes, great show!

The Royal Falconer & Liberty, who we met pre-show, did a fantastic job during their performance. It was really cool watching Liberty soar throughout the arena and overhead, as well as work with the Royal Falconer.

Medieval Times | theinspiredparent.com

Medieval Times | theinspiredparent.com

Our Red & Yellow Knight didn’t win this particular tournament, but he sure was fun to watch! Our daughter was quite happy that he threw a flower to her during dinner, too. 🙂

Medieval Times | theinspiredparent.com

The six knights ready to compete!

Medieval Times | theinspiredparent.com

Medieval Times | theinspiredparent.com

Of course there has to be a villain…the mood sure shifted when he was around…and at the end he appears to have been captured, but you won’t know for certain unless you go and see the show!

Medieval Times | theinspiredparent.com

Medieval Times - Capturing the Villain | theinspiredparent.com

We will definitely head back again and this time we won’t wait another 15 years. As we were leaving the show our daughter asked if we could come back the next day. We told her that maybe we’ll go back this fall for her birthday…in this case, maybe is definitely a “yes.” We look forward to surprising her with the timing of our next visit.

Hope you have a chance to see Medieval Times Dinner & Tournament sometime soon! It is well worth the ticket price & a great way to spend a few hours with family or friends!


Almost Spring in Chicago!

I am a total autumn & winter gal — but waking up today with the bright sunshine, blue skies and hearing the early-morning chirping of the birds that were out and about definitely put me in a springtime mood!

After visiting the Shedd Aquarium, walk along the lakefront for a couple of blocks & make sure to see Buckingham Fountain!
After visiting the Shedd Aquarium, walk along the lakefront for a couple of blocks & make sure to see Buckingham Fountain! The fountain is turned on in early-April and stays on until late-fall.

We’ve been planning some upcoming outings, especially since the wee girl has her spring break from school in a couple of weeks. They will most definitely include the Chicago lakefront & downtown areas…so many options.

There's a lovely view of Chicago's skyline from the terrace of the Shedd Aquarium. We usually pack a lunch and eat outside when the weather permits.
There’s a lovely view of Chicago’s skyline from the terrace of the Shedd Aquarium. We usually pack a lunch and eat outside when the weather permits.

We’re a short car ride or quick train ride from all the wonderful things Chicago has to offer, so we frequent this great city of ours quite regularly. Our 7-year-old has her favorite museums, zoos & aquariums & we’ve held family memberships to several of them for many years — much more cost-effective than paying the admission fees upon each and every visit. Best part is that we get the added benefit of not waiting in the long, general admission lines since we can use the “members” lines instead. It’s also super convenient that two of her favorites happen to be right next door to each other.

We typically visit the Shedd Aquarium in the morning, have lunch and then walk over to The Field Museum for the afternoon.

I’m planning to go more in-depth in future articles about the various museums in the Chicago area, but for now, here’s a taste of a few of our favorite photos from recent visits to the Shedd Aquarium & The Field Museum.

One of my favorite jellyfish photos that I shot at the Shedd Aquarium - they are such mesmerizing creatures!
One of my favorite jellyfish photos that I shot at the Shedd Aquarium – they are such mesmerizing creatures!
Every kid seems to love "finding Nemo" in the Clownfish (a.k.a. Anemonefish) tank. This little fellow was a treat to watch last time we were at the Shedd Aquarium.
Every kid seems to love “finding Nemo” in the Clownfish (a.k.a. Anemonefish) tanks. This little fellow was a treat to watch last time we were at the Shedd Aquarium.
Seahorse is the name given to 54 different species - you'll find several types at the Shedd Aquarium - they're all a lot of fun to watch!
Seahorse is the name given to 54 different species – you’ll find several types at the Shedd Aquarium – they’re all a lot of fun to watch!
These little ones were masters at camouflage…then they finally swam out where we could get a better peek.
These little ones were masters at camouflage. They finally swam where we could get a better peek.

After our mornings at the Shedd Aquarium, we head next door to The Field Museum. Kids are so used to being told where to go and what to do, so we typically let our daughter guide the way during our museum excursions and decide which exhibits to see. We’ve found that this decision-making factor during our adventures has been a great way to pique her interest in the exhibits, even from toddlerhood. It’s been cool to see what she gravitates toward during each visit. I’m so glad that we’re raising a museum-lover!

Her favorite exhibit at The Field Museum is the Evolving Planet. This wonderful section takes you through 4 billion years of life on Earth and all of the various Mass Extinctions. Since she was about 18 months old, we cannot tear her away from this area.

Just one of many dino displays - makes every kid (and adult) dream of becoming a paleontologist!
Just one of many dino displays – makes every kid (and adult) dream of becoming a paleontologist!
Daspletosaurus display at The Field Museum.
Close-up shot of the tail of a Triceratops at The Field Museum's Evolving Planet exhibit.
Close-up shot of the tail of a Triceratops at the Evolving Planet exhibit.
I've always loved this Charles Darwin quote - the display of this quote is stunning in person when you come to the end of the Evolving Planet exhibit at The Field Museum. So cool!
I’ve always loved this Charles Darwin quote – proudly displayed in the last room of the Evolving Planet exhibit at The Field Museum. So cool!

Hope you’re planning some fun upcoming adventures with your friends & family! If you’re in the Chicago area, make sure to head to some of our wonderful museums this season. You won’t be sorry!